After a great semester,I'm back to the blog,with lots to post.
What is the PSoC 3?
I'll keep the answer tweet-length,
Cypress Semi-Ultra low power-Single cycle 67Mhz 8051-Programmable Digital blocks-Extremely powerful analog signal processing-max 62 GPIOs (TQFP).
Its available in QFN,SSOP and TQFP packages.See more about PSoC3 parts here.
It has 2 cousins(at the time of writing this article,PSoC4 hasnt come out.),PSoC1,with an M8C core and the PSoC5,which is an ARM Cortex M0 based device.
Software
To get started with PSoC,you need PSoC Creator 2.2 (latest when this was written).Its a ~500MB download,which you can get from Cypress Semiconductors website -> http://www.cypress.com/?id=2494
That download has the IDE,as well as the programming software and drivers,all in one easy to install package.
Sorry,the software isnt for OSX or Linux,only Windows XP onwards.
Hardware
You have quite a few options here.I'll cover the company kits first.See all the company's offered boards here
PSoC3 Starter Kit - CY8CKIT - 003 for $49.
It has the most powerful PSoC3 chip,the CY8C3866AXI-040,an Accelerometer, a Thermistor, Proximity Sensing, a CapSense® touch-sensing interface, a 12-pin wireless module header, and even 28 general purpose I/O pins (GPIOs).
I'd not advise you to go for this one,since its not very user friendly and in my opinion,not that suited for getting started with PSoC3.Just my opinion.
The kit you should go for,is this one right here - PSoC3 DVK or the CY8CKIT - 030.It will cost you $99,but its the best kit the company sells,in my opinion.This board has everything you'd want on your PSoC3 board,and very user-friendly and high performance.

I have been using it for almost 2 years now,and I dont have a single complaint.Everything is just perfect.Kudos to the team at Cypress Semiconductors behind this one.Highly recommended.
Theres another 'mega-kit' of sorts called the CY8CKIT-001,which can support PSoC1,3 and 5.But its only for people who need tons of GPIOs,and can pay a steep USD 250.I have used it,but dont recommend it for people starting with PSoC.The best one is still the 030.
--
Now if youre not the off-the-shelf types,and want to make your own hardware,then here are your options:
The QuickPSoC3: This is a board I made,which I could customize and etch using toner transfer,to get a working PSoC3 board in under an hour,on the cheap.

Its open source hardware(CC-BY-SA3.0),so feel free to download and modify the files to suit your needs.
Read more about it and Download CAD files here.
The EzPSoC3 : I made this board an year ago,fed up with pricey company kits and archaic lab rules at my university.Its a sweet minimalist PSoC3 board,with USB support and more.Its open source,and licensed CC-BY-SA3.0
 I am not selling this as a kit/barePCB as of now.You could download the CAD files(Eagle 6), and forward them to your fav PCB house for a low cost and easy to use PSoC3 board :)
Download CAD files here.
The EzPSoC3(zeta's mod) has a few variants too,one made by zeta over at the Cypress Developer forums,and its CAD files made in EAGLE are linked here.

Theres the freeSoC,another open source (PSoC5 though) board thats backed by a very successful kickstarter campaign.Check it out here.
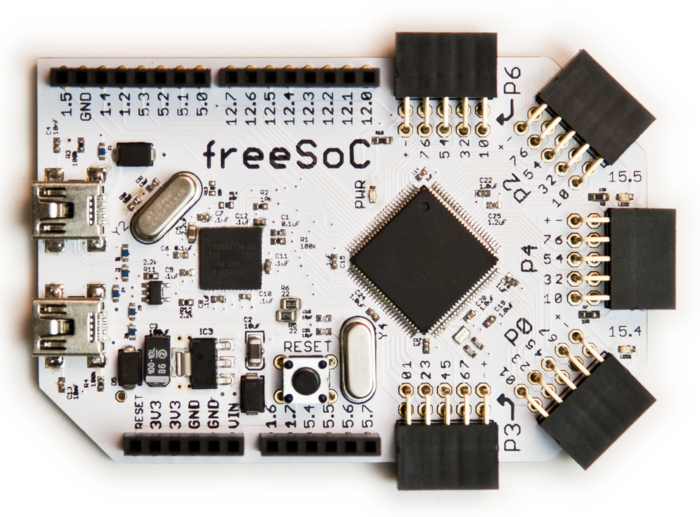
and it has a mini version too :)

Great work Jon Moeller!

Theres one called Loki,a very feature rich arduinoesque PSoC3-5(the QFN package is pin compatible) board in development by nickjohnson.You could read and follow his development over at the DangerousPrototypes thread hes updating.
Theres also a few by Gadgetfactory.net (makers of the famous Papilio FPGA platform and the Open bench logic sniffer ) Heres a pic of their smaller board,nicknamed Dragonfly,coming soon!


There are a few PSoC3 board designs by japanese hobbyists and vendors too.You could check those out here -
aasoukai128's board ,
ITCorp24's PSoC boards (not opensource.)
There are quite a few other boards in the wild,I'll add more as I spot em.
What is the PSoC 3?
I'll keep the answer tweet-length,
Cypress Semi-Ultra low power-Single cycle 67Mhz 8051-Programmable Digital blocks-Extremely powerful analog signal processing-max 62 GPIOs (TQFP).
Its available in QFN,SSOP and TQFP packages.See more about PSoC3 parts here.
It has 2 cousins(at the time of writing this article,PSoC4 hasnt come out.),PSoC1,with an M8C core and the PSoC5,which is an ARM Cortex M0 based device.
Software
To get started with PSoC,you need PSoC Creator 2.2 (latest when this was written).Its a ~500MB download,which you can get from Cypress Semiconductors website -> http://www.cypress.com/?id=2494
That download has the IDE,as well as the programming software and drivers,all in one easy to install package.
Sorry,the software isnt for OSX or Linux,only Windows XP onwards.
Hardware
You have quite a few options here.I'll cover the company kits first.See all the company's offered boards here
PSoC3 Starter Kit - CY8CKIT - 003 for $49.
It has the most powerful PSoC3 chip,the CY8C3866AXI-040,an Accelerometer, a Thermistor, Proximity Sensing, a CapSense® touch-sensing interface, a 12-pin wireless module header, and even 28 general purpose I/O pins (GPIOs).
I'd not advise you to go for this one,since its not very user friendly and in my opinion,not that suited for getting started with PSoC3.Just my opinion.
The kit you should go for,is this one right here - PSoC3 DVK or the CY8CKIT - 030.It will cost you $99,but its the best kit the company sells,in my opinion.This board has everything you'd want on your PSoC3 board,and very user-friendly and high performance.

I have been using it for almost 2 years now,and I dont have a single complaint.Everything is just perfect.Kudos to the team at Cypress Semiconductors behind this one.Highly recommended.
Theres another 'mega-kit' of sorts called the CY8CKIT-001,which can support PSoC1,3 and 5.But its only for people who need tons of GPIOs,and can pay a steep USD 250.I have used it,but dont recommend it for people starting with PSoC.The best one is still the 030.
--
Now if youre not the off-the-shelf types,and want to make your own hardware,then here are your options:
The QuickPSoC3: This is a board I made,which I could customize and etch using toner transfer,to get a working PSoC3 board in under an hour,on the cheap.

Its open source hardware(CC-BY-SA3.0),so feel free to download and modify the files to suit your needs.
Read more about it and Download CAD files here.
The EzPSoC3 : I made this board an year ago,fed up with pricey company kits and archaic lab rules at my university.Its a sweet minimalist PSoC3 board,with USB support and more.Its open source,and licensed CC-BY-SA3.0

Download CAD files here.
The EzPSoC3(zeta's mod) has a few variants too,one made by zeta over at the Cypress Developer forums,and its CAD files made in EAGLE are linked here.

Theres the freeSoC,another open source (PSoC5 though) board thats backed by a very successful kickstarter campaign.Check it out here.
and it has a mini version too :)
Great work Jon Moeller!

Theres one called Loki,a very feature rich arduinoesque PSoC3-5(the QFN package is pin compatible) board in development by nickjohnson.You could read and follow his development over at the DangerousPrototypes thread hes updating.
Theres also a few by Gadgetfactory.net (makers of the famous Papilio FPGA platform and the Open bench logic sniffer ) Heres a pic of their smaller board,nicknamed Dragonfly,coming soon!


There are a few PSoC3 board designs by japanese hobbyists and vendors too.You could check those out here -
aasoukai128's board ,
ITCorp24's PSoC boards (not opensource.)
There are quite a few other boards in the wild,I'll add more as I spot em.


